The 7th Continent – First Impressions
May 18, 2018Good day to you Reader! Are you ready to explore the world of The 7th Continent? Well good, because this damn place is daunting, scary and unforgiving. But before we dive in, how does a bit of an overview sound?
*spoilers for The Voracious Goddess*
7th Continent is published by Serious Poulp, designed by Bruno Sautter and Ludovic Roudy. Set in the early twentieth century, you play an adventurer who is compelled to return to The 7th Continent to dispel a curse that befell you on a previous expedition to said continent. The game consists of hundreds of square cards. The majority of which are terrain tiles that will be used to create the board as you explore the continent during gameplay.
SO MANY CARDS TO ORGANIZE I LOVE IT
As your character moves off of a terrain tile to an unexplored part of the map, you resolve any event tiles that may be connected to that terrain tile, then find the card that corresponds to the number that appears on the terrain tile you are moving from. Once the new tile is placed, add any event tiles to the board as indicated by the new terrain tile. You continue to do this as you explore, uncovering more and more of the continent.
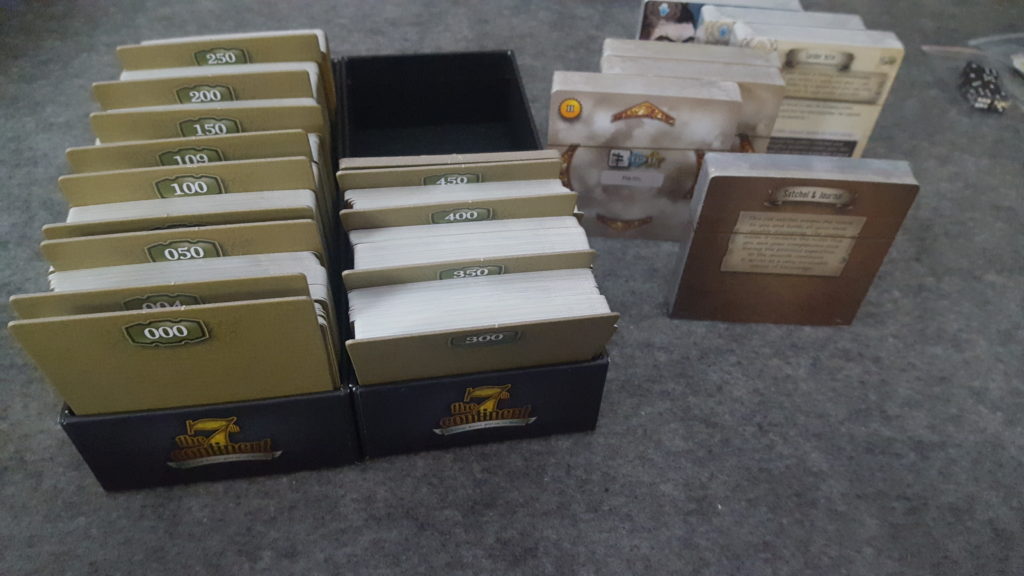
Also found on the terrain tiles, are actions that a player can take on their turn. These are tied to the main mechanic of the game, the action deck. This deck serves as the timer for the game, and represents a player, or player’s, life force as they explore the continent. The action deck consists of craftable items, generic curse cards, skill cards, and character specific skill cards. These cards will have two parts to them: the main text and effect that the item or skill has in the game, and a varying number of stars, or half stars, that run down the left side of the card. These stars only come into play when resolving an action. Looking at the terrain card below, you see the “keep balance/jump” action that you need to take to be able to move past the jagged rocks and crashing waves.
Bloody jagged rocks were the bane of my existence
This action requires you to draw a minimum of three cards from the action deck. This signifies the amount of time and energy it takes to (hopefully) get safely across the rocks. You then look at the left side of these three cards and count the number of whole stars depicted. To successfully cross the rocks, you need at least one star.
Phew! The active player can choose one of these skill cards to add to their hand.
Success! Just barely, but you made it across. If this is the first time you have crossed the rocks, you would then find terrain tile 017 and move your character to the newly discovered tile. Now, you get to choose one of the three cards you just drew to attempt the action, and put it into your hand, discarding the other two. In this case, the 3+ in the little blue square means that you could have chosen to draw more than three cards from the action deck to increase your chances of success. Spending more time and energy to perform the action. Regardless of how many cards you chose to draw, you will only ever be able to keep one of them.
If the action deck ever runs out, you shuffle the discard pile and flip it over. You now draw from the top of the discard pile when performing actions. However, if you ever draw one of the generic curse cards from the discard pile, you have succumbed to the life force draining effects of your gross, cursed body and have perished. So don’t do that, that’s really bad.
And that’s it really. There are a few more little rules you need to abide by like hand limit, crafted item limit, crafted item degradation, combining items with similar keywords, etc. Basic inventory management stuff that add nice game decisions and different strategies to deal with whatever the continent throws at you. This game boasts that there are countless hours of gameplay in the base box, and it definitely lives up to that boast. I’ve put in a solid twenty hours so far and haven’t come anywhere close to solving one of the curses. And those twenty hours have exclusively been spent on one of the four curses that come in the core game. Which is why this article can really only be called a first impression. With that being said, I’m going to dive into my experience with the recommended starting curse, The Voracious Goddess.
I chose to play as Howard P. Lovecraft for this adventure. There are more than half a dozen characters you can choose from, each with their own unique perk, and unique skill cards that you add to the action deck before starting the game. In a game with two or more players, those skill cards can only be used by the player who has the matching character. Since my only experience with The 7th Continent is playing it solo, I only added my own character skills so I never ran into the problem of drawing into other character’s skills. It’s interesting though that with multiple players, as long as they are on the same terrain tile with the active player, any amount of characters can take part in an action. They would all just reap the benefits/suffer the consequences of whatever the outcome is. The active player can also choose another player taking part in the action to gain the single item/skill card you get from the action attempt. So even if I’m the active player and draw into your character’s unique skill card, we don’t automatically have to throw it away if you’re doing the action with me.
That brings up another interesting rule too. Any player can take multiple turns in a row, and players can take turns in any order that the table agrees on. I can see this adding more problem solving layers onto the gameplay. All players share that action deck, so the table could choose to try and hunt for some food or other resources that can return discarded cards to the main deck before attempting an action elsewhere on the map that will chew up a bunch of cards to accomplish. Maintaining that action deck is obviously crucial to being successful. It really does an amazing job at emulating the player’s survival on this expedition. I constantly found myself starting the game entirely complacent, barely even concerned with doing a little extra exploration, using up a few extra cards on the actions. Then, all too suddenly, I’m down to less than ten cards and stuck between a bunch of jagged rocks and a valley of geysers spurting fumes of hot gas that burns your skin!
As luck would have it, you wake up on this barren slab of rock with no recollection of how the hell you ended up there. Awesome, right? So obviously I need to explore. Next to me is this big ass cliff face that looks pretty rough to try and free climb. I decide to head north, though this is north of my current position relative to my perspective, I have no idea what direction this is on the actual continent. But I stumble across this nasty looking body, clad in nautical garments, with egg sacs under the skin. Playing the role of Curiosity in the old adage, I get closer to investigate it, and am promptly met by a giant squid monster thing, having been cast as Killed The Cat!
By some miracle I fought off the monstrosity. Gaining a weird looking fish and finding a metal gear on the body. The spot where I found the body kind of looks out over this rocky shore, where I can try to swim out to the mainland. At this point, it’s pretty clear that I’ve washed up on a small island just off the coast of the mainland of the continent. I consult my map that you start the adventure with. It’s this crudely drawn thing with no scale, dotted with what look like idols of some sort. I match up the shape of what I think is the rocky shore I’m standing on with a part of the map and decide to just go for it. What’s the worst that could happen?
Well, getting eaten by a damn shark is what could happen! I overdraw on the action cards and barely make it back to shore, avoiding the gnashing and rending of serrated teeth in my cushy man flesh. But it took a ton of energy and now I’ve acquired the Tired trait. These traits can possibly impose penalties on future actions you take if they aren’t dealt with. But I can’t stop now, I have to press on, I must find a way to the mainland! I do scarf down that gross fish though, shuffling 4 random cards from the discard pile back into the action deck.
I move onto some new terrain tiles, eventually finding this place with yellow gas geysers (the burny ones) and some weird red seaweed stuff which gives me the vine resource. The way resources work in this game is, a terrain tile may have an icon in the bottom right corner. If you’re in a forest, you would have access to the wood resource. Pretty much the only thing on this damn island is the stone resource. So finding some vines was a nice change. But if you are on a tile with a particular resource, and you want to craft an item that utilizes that resource, it makes that item more efficient to craft. Crafting an item is an action a player can take on their turn, and it uses cards from the action deck like any other action, requiring you to draw X number of cards to get X number of success stars. With the vine resource, it was easy peasy making a rope! So I chose the rope item from my hand that I had found from performing actions and drawing cards from the action deck. Now I could go and try to climb that cliff face from where I woke up. I also decided to make an imaginary friend, which for Howard, is a freaky looking skull.
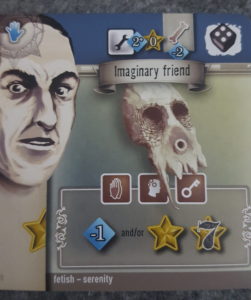
If you have the bone resource, this card costs two action cards less to craft
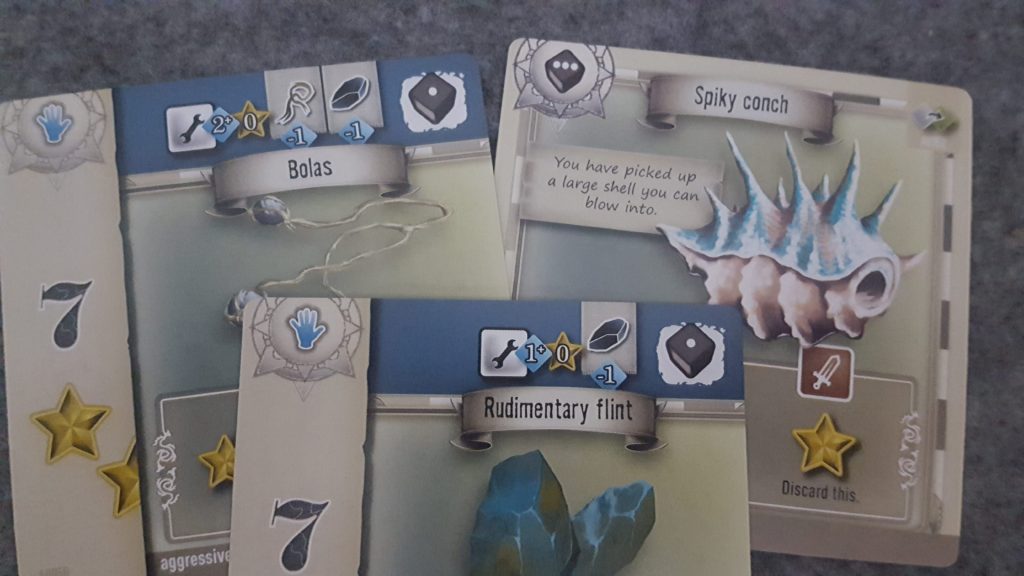
When you craft an item, you place a six sided die on it, starting with the pip value depicted on the item card. Every time you use an item, you decrease the value by one, degrading the item. Items will have action symbols on them set in a brown box, which indicates that you can use them when performing those actions to increase your odds of success. I get a little craft crazy and make the ultimate tool for surviving an unknown continent. The super, ultimate, efficient BOLA CONCH FLINT THINGY! Combining items is an important part of inventory management in this game. When you combine two items, you create a stack in your play area. The player count dictates how many constructed items you can have, and how many cards can be in a single stack. Playing solo, for example, allows you to have four items constructed, each with a maximum of four cards in a stack. A stack still maintains a single condition die, it is just kept on the top item in the stack. The cool thing about that is, if you combine item cards that have one or more traits in common, you add the pip value of the newly constructed item to the pip value of the already constructed item card, the total never exceeding six. Otherwise, the newly constructed item’s uses fall under the already existing condition die, kind of thinning out a stack’s uses across more items.
There were a few occasions where I had an item with a condition value of four, and an item card in my hand that I wanted to construct, also with a condition value of four. Both of which shared the “will” trait. So stacking those two items would mean throwing away two uses, since I can’t get a combined value of eight, only six. This left me with a few choices I could make: not worry about losing the two uses, hold off on building the second item until I’ve used the first one a couple more times, or build the second item and use another item slot. All of these choices are further influenced by the game state(duh). Does my terrain card have the resource of the item I want to build to burn through fewer action cards? Am I already at my max hand size and will holding onto this item keep it clogged up and force me to discard something potentially life saving further into the game? How many items do I already have crafted, do I even have another item slot open? All small questions, the answers to which may have devastating implications later on.
THE ULTIMATE WEAPON!!!
But onto this cliffy mountain I am now equipped to climb. I don’t know what I’m expecting to be up there; maybe hoping to find some food source, or maybe even get a lay of the land from this vantage point. Ultimately, I climbed up there just to come to the conclusion that I was most likely going to starve to death. Now this is where I get my first real taste of the survival struggle and how important it is to manage that action deck. Which is starting to get really low, and at this point I feel like I’ve wasted a ton of time and have accomplished nothing. I go back to Red Seaweed City where I saw some slippery, jagged rocks on my first trip there. These things take three damn cards to cross, THREE. Take note of this Reader, because they’ll become a huge obstacle later on.
On the other side of the death rocks, I found a little inlet with some grave markers and YES! A submarine hoisted out of the water on some crane arms. SALVATION! I beeline right to the sub, using my rope to get some leverage on the rusted out control arm for the crane, dropping the sub into the water with a giant SPLASH! Diving inside, I find it empty. Nobody manning the controls, nothing of interest inside. But it looks simple enough to operate, and hey! A spot for the gear I found on the dead sailor! Put in the gear, throw some switches, pull some levers and I’m out of h-
All hopes of escape from this cursed island I may have had are crushed as I realize that I’m missing a gear! There’s a second one somewhere, back on the other side of those damn rocks. Here I go again, burning three more cards of the fourteen left in the action deck. A deck that started with about forty five cards at the very beginning of my adventure. So running out of time, starving, steam burns all over, I continue my search for food, and now, for the second gear to drive the sub. But there are nothing but obstacles that hinder my progress, as I fail to tip toe around a cluster of sea urchins, stepping on one and getting poisoned. All to find a small beachy patch with some animal tracks! I immediately get my bola conch flint ready to take down whatever the hell I can find. Which happen to be a couple of crabs that seemed much more difficult to catch than I would’ve thought.
Throughout the game, you might find some items, or food. They get added to your crafted items and take up slots like any of the items from the action deck would. So now I have two crabs just begging to be eaten, especially since moving through the urchins, and hunting the crabs was incredibly taxing. All of the food that I’ve found so far is far more effective if you have the fire resource. Cooking your food is always good right? Time for my bola conch flint to shine! Now just a conch flint though, since the bolas instruct you to discard them after use. The game comes with some fire tokens that you throw down on the terrain card when you make a campfire.
The two cooked crabs let me add a whopping twelve random cards from the discard pile back into the action deck, making the new action deck a total of twelve cards! It took my last card in the deck to make that damn fire. So with a full stomach, and the entirety of the island explored and developed, I still have no idea where this second gear is. But wait a second, the terrain tile I found those crabs on has this little number on it hidden in the grass! Very similar to the hidden numbers found in the Unlock! games. Out comes the magnifying glass that comes with the game so I can make out what number it actually is. When you find hidden numbers like this, you find the corresponding terrain tile from the box and replace the existing tile that depicts the hidden number, discarding it. More on how I feel about this mechanic later.
The new terrain tile now has a new action I can perform, allowing me to examine some crab tracks that led to a hole in the ground, hidden by some tall grass. Huzzah! The second gear is in there! I head back to the submarine, past the burny gas jets, over the jagged death rocks, through the creepy graveyard and right into the sub, slamming the gear in place and firing it up. Barely functioning, I’ve somehow navigated this metal tube of temporary salvation to the mainland. At this point, the game instructs me to wipe the board, returning all terrain tiles to the box, and to pull out a new starting terrain tile. From here I can continue to explore and build a new map on the mainland of The 7th Continent.
Well that was a textbook and a half of a play by play for my first experience with The 7th Continent. Now I’ll drone on for another seventeen pages to “summarize” my thoughts in the disorganized and stream of consciousness kind of way my brain seems to work(kidding not kidding). I do hope I’ve done a good job of describing how narrative this game really is, while interspersing some of the game’s mechanics for some context for the choices and decisions the game presents you with.
And that’s really what I love about it. Every gameplay decision you make has a thematic tie in as you use your club to fight off a squid monster or you make a raft to try and get off of an island. And the artwork does a great job of adding to the thematic touches and building the atmosphere as you go about exploring the continent. It’s manages to be very detailed, but never cluttered, even though the terrain tiles are not overly large. But again, I’ve only experienced the solo play, so I’ve always had free reign to just pick up any tile to have a look at it. And I build the board as close to myself as possible and never have to try and peer across the table at something.
These are pretty minor things, but if you played at the full, four player compliment, even if only half of the table wants to look at every new card in more detail, it can significantly slow down gameplay since those cards will also come with new events you need to populate the board with as well. I can definitely see myself preferring to only play this solo, which is uncharacteristically selfish of me. There is so much story to share with this game! I just want to be the only hero and get to do all of the things and solely persevere on the merit of my skills and nobody else’s. Is that really too much to ask for? The game seems more special that way.
One thing I am curious about though, is the table strategy that comes with deciding which player gets to take which action, or actions, at what times. Does the party stick together to make actions more efficient and divvy up the skill cards, or split up to cover more ground? The game employs a mechanic that reduces the action card cost of the movement action when you are moving to a terrain tile with another player or fire marker. So it seems to encourage forging your own path, because it is relatively easy to get back to each other if needed. Which will be the case if you come across an action that requires all players to be involved to attempt it.
If you do split up though, there will obviously be more downtime if the active player is across the map and performing actions that you can’t take part in. But the co-operative nature and shared action deck does keep all players involved in each decision. What would be cool is if you could form two groups and they could both operate simultaneously. But that doesn’t quite work because of that action deck. It’s the end game trigger for everybody, so everybody should really have a say when performing actions and determining the number of cards you draw to do so. I also wonder if more players will help level out the difficulty of the game. It is very challenging solo. Either that or I am just terrible at it.
Getting back to the hidden number thing, and comparing it to the same mechanic used in the Unlock! series of escape room games. I HATE this stupid mechanic in Unlock! Just straight up hate it. Something about hiding a white number on a white background seems like fucking lazy game design to me. In The 7th Continent, it is totally tolerable though.
“But Leland WHY? DOUBLE STANDARD LELAND!” demands Reader.
A valid question Reader! And the answer really boils down to the mechanic not being a necessity for success in The 7th Continent. If I had not found that second gear to get the sub working, I would have had to brave the cold, salty, shark infested waters once again and attempt to get to the mainland. In Unlock!, if you don’t find that number, you don’t find that solution, and you do not progress. An Unlock game is a single, linear string. It might have some frays here and there that let you tangent, but it still only goes in one direction. The 7th Continent is a spiderweb with multiple connections and multiple directions to travel in.
That being said, both games will funnel you towards the ultimate goal. The 7th Continent’s sheer amount of content and choices it throws at you serves as the blindfold and spin as you attempt to pin the tail on the donkey. The scope of Unlock is just too small for this weak link mechanic to not snap the whole chain for me.
The largest negative of The 7th Continent is it’s learning curve. Though, I don’t think learning curve is exactly the right term, because the base game mechanics are quite simple. But there seem to be a lot of nuanced interactions with some terrain tiles that can stall out the game. I spent about half of the first three to four hours of the game just referencing the rulebook and looking up rules questions online. During solo play, this really isn’t a huge deal to me, as I can take as much or as little time as I want figuring out a specific rule. But If I had to teach this game before getting the twenty or so hours of game experience under my belt, that wouldn’t have been fun at all for anybody.
This largely comes from the game’s format though. It is very legacy style-ish, as you’re always uncovering something new and having to learn some things on the fly. If you’ve listened to some of our coverage of Stonemaier Games’ Charterstone on the podcast, you’ll know that I have a similar problem with that game. There is a fine balance that needs to be struck between overwhelming players with information, and not giving them enough to have to adapt to, or keep them interested. This game hits that balance ninety five percent of the time.
Alright, back to some positives! My favourite part of this game has to be the inventory management, and the item stacking mechanic. It adds more impact to resolving actions than just succeeding because you now have to choose which card to keep from the drawn cards, and possibly, what card to discard from your hand if you’re at your max hand size. You might find some camouflage that could be useful, but it doesn’t share any keywords with any of the items you already have built and you’re maxed out on crafted item slot. Which item stack do you add it to then? Whichever one you choose will be diluting the amount of uses you have for each, since they now have to share the pip value of the item at the top of the stack.
Even if you do find a new item that shares a characteristic with one you have crafted, adding it to that stack also puts a strange limitation on it. Yes, you get to add the pip value of the newly crafted item to the previous one, but now you potentially have two really useful items, used for different circumstances. I have a bow and a walking stick stacked together. Both great items and extremely useful. I was using the walking stick way more than the bow, since it can reduce the number of action cards you need to draw from the action deck when resolving the walk action.
But by the time I came across some animal tracks, or ran into a predator of some kind, I had used up most of the uses with the stick, and only had a pip value of two to get uses out of the bow! The shared keywords is a very interesting feature and is just one of many, many simple layers of The 7th Continent that make the best damn dip. Just don’t eat powdery chips at my game table! After my first play, I instantly regretted not backing any of the expansion material, I was hooked. And I can easily see myself continue to be hooked for dozens of hours to come. Thanks for dropping by Reader!
L.